Fight Flash Fraud (F3) - Auto-reset hardware
F3 is an amazing alternative to h2testw, that allows you to test a USB flash
drive to find out if it has less capacity than it claims.
There are a lot of fake USB flash drives on Ebay and other stores. When you use
them, they appear to be storing all your data, but when you try to retrieve it,
much of it is just gone.
f3probe is part of F3, it will test the USB flash drive for you and tell you
if it’s a fake and how much real memory does it have, but there’s a catch: it
requires you to physically disconnect and reconnect the drive manually, which
slows down the whole process and becomes tedious if you need to probe more than
one drive. Here is the solution: a hardware that f3probe will use to
automatically connect and reconnect you USB drive without human intervention.

Software
You’ll need to use a modified version of F3 that you can find in this
branch.
Download it, compile it and install it with:
$ make
$ make experimental
# make install
Hardware
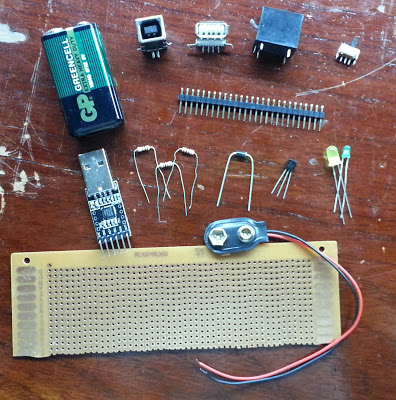
This is the list of materials you’ll need for the project:
- 1 Relay (small)
- 1 USB A female connector
- 1 USB B female connector
- 3 1K resistors
- 1 2N3904 transistor
- 1 1N4007 diode
- 1 3 mm green LED
- 1 5 mm yellow LED
- 1 9V battery
- 1 9V battery connector
- 2 electronic pins
- 2 female to female pin wires
- 1 Interrupter
- 1 perforated PCB
- 1 USB to serial/UART converter
- 1 USB cables
For the USB to serial/UART converter, make sure it has a DTR pin.
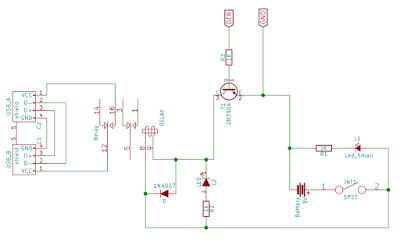
Build the hardware using the following schematic (here is a PDF of
it):
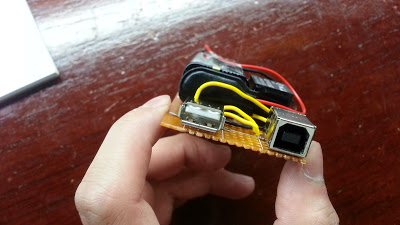
It’s a good idea to glue the USB connectors to the board. Here is how it looks
like when built:
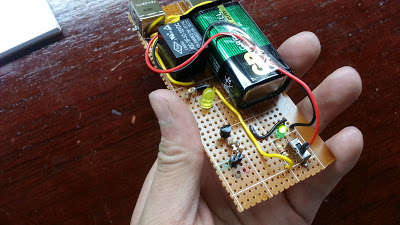
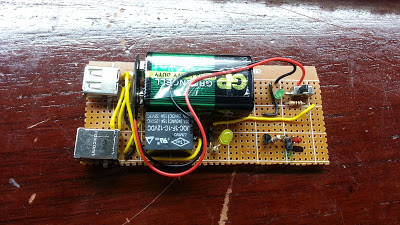
The reason I used a 9V battery here is to make it easy to build without the need
for an external power supply. And yes, you could use voltage booster to use the
USB 5v supply, but then over-current issues may appear and… Let’s just keep
the computer safe, shall we?
Usage
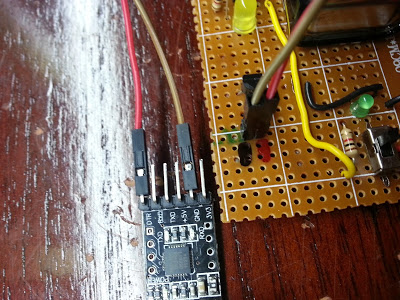
- Connect the GND and DTR pins of the board with the corresponding ones in
the USB-Serial converter like this:
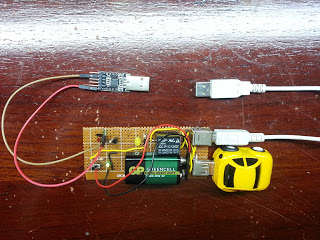
- Connect the USB-Serial converter to the computer using an appropriate cable
(USB extension in my case).
- Connect the board to the computer using an A to B USB cable.
- Connect the target USB flash drive to the board.
- Turn on the board (the green LED should turn on).
Then make sure you have the /dev/ttyUSB0 file, if your USB-Serial converter is
on other file, make a symbolic link like this:
# ln -s /dev/ttyYOURDEVICE /dev/ttyUSB0
Now you can probe your USB flash drive using the reset-type option with a value
of 2:
# f3probe --reset-type=2 /dev/TARGET
Replace TARGET with your device, just be sure it’s actually the USB flash
drive before you hit enter so you don’t mess up your hard drive or something.
Now the board will start blinking the yellow LED and f3probe will report
device resets multiple times. When it’s done it will tell you if your flash
drive is a fake or not.
F3 is an amazing alternative to h2testw, that allows you to test a USB flash drive to find out if it has less capacity than it claims.
There are a lot of fake USB flash drives on Ebay and other stores. When you use them, they appear to be storing all your data, but when you try to retrieve it, much of it is just gone.
f3probe is part of F3, it will test the USB flash drive for you and tell you
if it’s a fake and how much real memory does it have, but there’s a catch: it
requires you to physically disconnect and reconnect the drive manually, which
slows down the whole process and becomes tedious if you need to probe more than
one drive. Here is the solution: a hardware that f3probe will use to
automatically connect and reconnect you USB drive without human intervention.
Software
You’ll need to use a modified version of F3 that you can find in this branch.
Download it, compile it and install it with:
$ make
$ make experimental
# make installHardware
This is the list of materials you’ll need for the project:
- 1 Relay (small)
- 1 USB A female connector
- 1 USB B female connector
- 3 1K resistors
- 1 2N3904 transistor
- 1 1N4007 diode
- 1 3 mm green LED
- 1 5 mm yellow LED
- 1 9V battery
- 1 9V battery connector
- 2 electronic pins
- 2 female to female pin wires
- 1 Interrupter
- 1 perforated PCB
- 1 USB to serial/UART converter
- 1 USB cables
For the USB to serial/UART converter, make sure it has a DTR pin.
Build the hardware using the following schematic (here is a PDF of it):
It’s a good idea to glue the USB connectors to the board. Here is how it looks like when built:
The reason I used a 9V battery here is to make it easy to build without the need for an external power supply. And yes, you could use voltage booster to use the USB 5v supply, but then over-current issues may appear and… Let’s just keep the computer safe, shall we?
Usage
- Connect the GND and DTR pins of the board with the corresponding ones in the USB-Serial converter like this:
- Connect the USB-Serial converter to the computer using an appropriate cable (USB extension in my case).
- Connect the board to the computer using an A to B USB cable.
- Connect the target USB flash drive to the board.
- Turn on the board (the green LED should turn on).
Then make sure you have the /dev/ttyUSB0 file, if your USB-Serial converter is
on other file, make a symbolic link like this:
# ln -s /dev/ttyYOURDEVICE /dev/ttyUSB0Now you can probe your USB flash drive using the reset-type option with a value of 2:
# f3probe --reset-type=2 /dev/TARGETReplace TARGET with your device, just be sure it’s actually the USB flash
drive before you hit enter so you don’t mess up your hard drive or something.
Now the board will start blinking the yellow LED and f3probe will report
device resets multiple times. When it’s done it will tell you if your flash
drive is a fake or not.